
You may have noticed the many vinyl car wraps that are being used on roads today. They are often not distinguishable from expensive custom paint jobs. Vinyl is a great option if you like bright colors, unusual finishes, or a vehicle with a changing look.
Vinyl is a cost-effective and easy way to transform the appearance of your car. It’s also becoming more popular among drivers. Vinyl is a great way to express yourself, but also offers many practical benefits. It is a durable coating that protects your car’s original paint job and helps to preserve its resale price. It can be removed at any time, so it is less commitment than permanent paint jobs.
You don’t have to wrap your entire car if you want to try vinyl wrapping. Your car’s hood is a small, flat area that makes it easy and inexpensive to wrap. You can still use it to show off your personality and install advertising. However, it takes much less time than a full wrap.
Some drivers are even willing to take on the project. There are many designs to choose from, so it’s a great way for you to get to know vinyl wrap before you commit to wrapping your entire car. Even if you are a complete beginner, we have compiled a step-by-step guide to help create a perfect hood.

Assemble your supplies
Before you can get started, you’ll need to purchase a few supplies. You will need to have at least a few supplies for car cleaning. You can also use gloves, a clay bar, and a tucking device to make it easier. Once you are done, heat sources such as a hair dryer or heat gun will be needed to seal the vinyl.
Make sure to choose a trusted brand when choosing vinyl. For a long-lasting car wrap, thin, flexible cast vinyl is best. Higher-quality vinyl will simplify the wrapping process and result in a longer-lasting, beautiful and durable project.
Give it an excellent scrub
The car’s surface should be completely clean and smooth before you apply vinyl. You shouldn’t try to cover up any rust or deep scratches that could prevent vinyl from adhering.
To remove dirt and dust, wash the car with soapy water. A clay bar can be used to remove invisible impurities from the hood. A degreaser is also recommended, especially for the edges of your hood.
Upload your vinyl
You should not work with vinyl in too hot or too cold areas. It should be shaded from the sun and temperature-controlled. Vinyl performs best when it is between 60-75 degrees Fahrenheit and 75 degrees Fahrenheit.
Leave the backing intact and drape the vinyl over the car’s hood. Use your magnets to secure the vinyl in place. Make sure there is no excess at any edges. You can trim excess vinyl if you need to, but don’t cut too much.
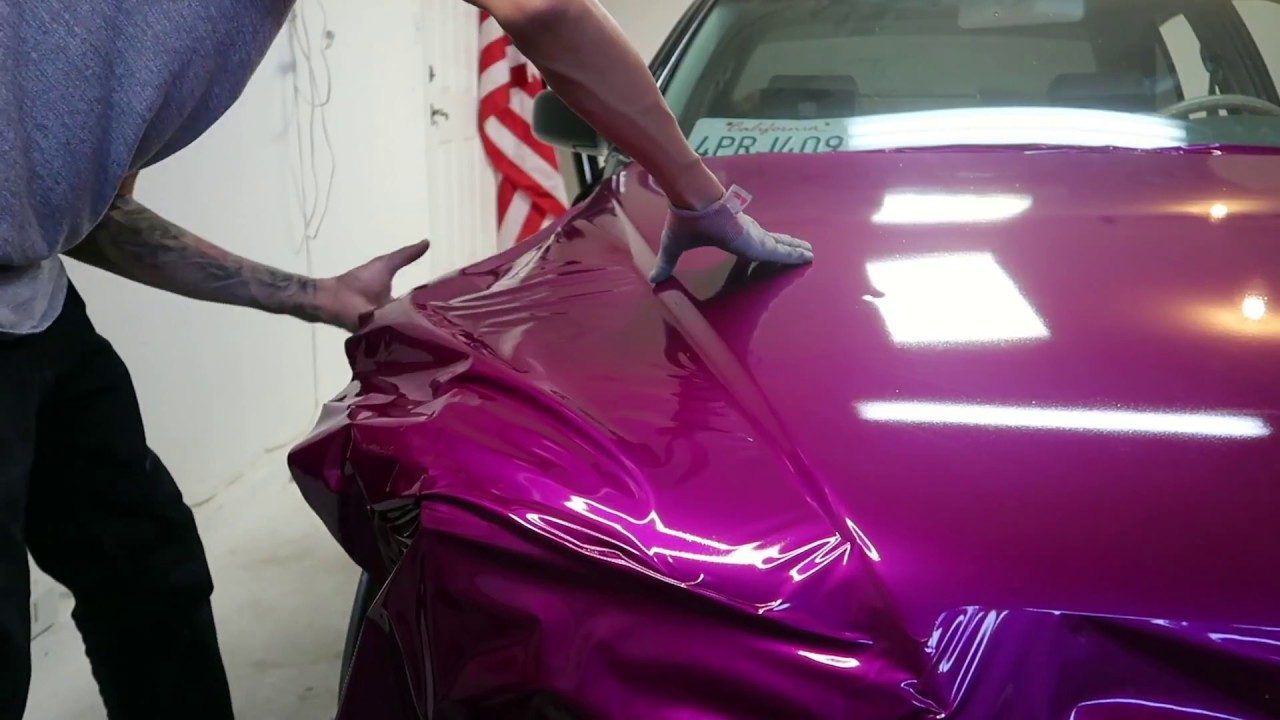
Apply the vinyl
Once you have your vinyl, you can start to remove the backing. Begin by working in a small area. Next, pull toward the corner of your hood using enough tension to prevent wrinkles and bubbles. Allow the vinyl to settle onto the car’s hood and into any curves.
You can use your soft squeegee, if the vinyl is smooth, to press it down. Press at a 45-degree angle, using overlapping outward strokes. Continue working in sections until you have applied the entire piece. To allow the vinyl to float again, lift it gently.
Some vinyls include a cap sheet. If you have a vinyl with a cap sheet, gently unwrap the hood and then pull it off using tape. You can also recycle the cap sheet. Read more about Retread Tyres or New Tyres? Which is the Best Choice? click here.
Seal the edges
Now, you can begin to trim the edges of your vinyl. To ensure that the vinyl stays in place, always start at the corners. Tuck the edges under to get good coverage. The vinyl will become more flexible and manageable by heating.
After the corners have been completed, trim the edges along the hood’s sides, working in the direction of the corners. While you won’t have to leave as much edging on the sides, it is recommended that at least one-quarter inch be left all around. You can avoid any damage to your car’s hood or paint by lifting the film of the car while you are cutting.
To ensure that they grab, run your bare or gloved finger along the edges. Then heat them to seal them.
End it off
After the wrap has been rolled into place, and the edges have been trimmed and sealed properly, heat your heat gun to run the entire hood. You can now identify and remove any air bubbles by running your heat gun along the entire hood. Heat will allow most high-quality vinyl products to heal themselves if you have caused minor scratches while applying it.
You can now drive your new hood! Rapid Clear can protect and enhance the shine of vinyl. You can take care of your new hood by washing it by hand, removing dirt and pollutants, and avoiding direct sunlight as this may cause fade.
If you don’t love your new hoodie, It’s removable so you can wrap it in another material. There are many unique types of vinyl that can add value to your car, including animal prints, reflective chrome, and advertising. We’re looking forward to seeing you out on the road!